Journals & Collaborative Projects

Below you will find a sampling our members' work from previous collaborative projects.  Click on images to view them larger. We hope this will inspire you to come and play with us! If you are interested in joining our group, please visit us at: http://groups.yahoo.com/group/Paper_Traders/

Tutorials & Techniques

Below are some of our favorite tricks for adding depth and dimension to your art.  We hope you have fun giving these a try!

Current Group Swaps & Projects

Below is a list of current swaps and projects available to group members. If you are interested in joining our group and participating in these projects, please visit us at: http://groups.yahoo.com/group/Paper_Traders/.  

For existing group members, you can sign up to participate  in these projects here: Swaps & Current Projects.  

We look forward to swapping with you.  Happy Arting!

Member Gallery for Group Swaps
 
Below you will find a sampling our members' work from previous group swaps and projects.  Click on images to view them larger. We hope this will inspire you to come and play with us! If you are interested in joining our group, please visit us at: http://groups.yahoo.com/group/Paper_Traders/.
 
Come play with us... Join today!

Paper Traders is a friendly online community of artists from around the world. We nurture and value creativity, embrace new ideas, products, and techniques yet also value tried and true methods of artistic expression. Our projects consist primarily of paper arts, mixed media collage, artist trading cards, altered art, assemblages, collaborative journals, mail art, and more.

We are interested in creative individuals of varied skill levels who wish to challenge themselves artistically and help build a supportive community. We are at our best when we can share our creative efforts as well as techniques, resources, feedback, and insights. We encourage conversation about art, the art process, and what it means to be an artist.

Paper Traders is hosted on Yahoo Groups at http://groups.yahoo.com/group/Paper_Traders/.
We hope you will consider joining us on an artistic journey!

In order to prevent spammers and to insure that all applicants are actual persons interested in creating art, a questionnaire will be sent to all potential members. When applying, please submit digital examples of your work or direct us to a website where we can view your art. The intent of the questionnaire is not to judge the merits of your art but to safeguard the integrity of our community.

Free Images for Download

Below you will find images that are owned by our group members and offered for your personal use as well as images found in the public domain. Images may be freely used in your personal artwork but may not be used for commercial purposes of any kind without written permission of the owner. No images may be used to create collage sheets or image collections for resale.

To download, follow the link provided. In some cases, you may be able to just click on the image to enlarge it, then right-click and select "save image as". Content changes frequently and many images are available for a limited time.  Please check back often for newly posted images to use in your art journey.

Open Art Challenges !

We're changing things up here at Paper Traders. Instead of the monthly challenges of the past, we'll now be hosting special challenges that might feature a specific technique or product and will be rewarded with actual prizes sponsored by our group members.

Our new challenge for 2013 is a year long word prompt journaling project/challenge. Each specific challenge will be open for one month and all art bloggers can participate, whether you are a Paper Traders member or not. Each artist will comment with a link to their blog post that features the artwork for that particular challenge. For each challenge, a winner will be selected whose art best exemplifies the challenge. The winning artist will be featured here and get a "Trader Treasure" blog button to display on their own blog. They also will receive one chance for each entry for the end of the year prize drawing. Watch this page for more details and challenge announcements.

Wednesday, March 27, 2013

A Restructured Paper Tutorial


Our Paper Traders yahoo group recently hosted a 
restructured paper swap based 
on an article from Cloth Paper Scissors Magazine
 by Frankie Fioretti and Susan Pickering Rothamel
 and then reviewed at the old Gingersnaps blog

As our members started experimenting with the various ways of creating this paper,
 we thought we would put together a step by step and share our tips, 
successes and what to stay away from.  


As we found out, the base that you start on is very important. The Gingersnaps blog 
recommended a non-sticky craft mat. Some craft sites said that a kitchen cutting mat 
would work as well but our member Beckie H. stated that when she tried this, her paper
 stuck to the mat and would not peel off. The next time she used her silicone craft mat
 and it worked perfectly. I used Reynolds Freezer Paper as my base and it
 worked very well, the restructured paper peeled off without a hitch.
 Other members just clued their scraps to white copy paper and so did not have to 
worry about peeling anything off and had good results with this as well. 

Types of glue to use: I used a 1 to 1 mixture of Alene’s Tacky Glue and water. 
Other recommended glue was Perfect Paper Adhesive , a mixture of Mod Podge and gel 
medium or Golden Glazing Medium/matte. 

Supplies: Tacky glue, Scrap paper, freezer paper 

For my first step, I glued down six sheets of vintage paper to make 
a paper size of about 12”x12”. You could have your first base layer 
be anything you want but I wanted some of the text to show through 
as I was going to be using some tissue napkin scraps in my design. 


Start arranging your scraps of paper from your
 “I can’t throw it away” stash and play around with some designs. 

Tip: When you are happy with your arrangement, take a picture of it with 
your cell phone or digital camera. Once I started lifting and gluing pieces, 
I sometimes forgot where I wanted certain pieces to go.


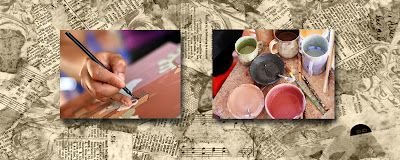
Apply your glue with a brush to the backsides of your scraps 
and start layering. I used a heat gun to speed the drying process up. 
I’ve basically finished my restructured paper here and only needed 
to go back and add some little embellishments to flesh it out. 


In this photo, I’ve gone back and added some paper flowers, hole punches 
and a little bit more scraps. 


Some close-ups of the restructured paper. 


After your paper has dried you can peel it off the freezer paper
or craft mat if that is what you are using,
 and use it in a variety of ways. 

Tip: You can iron your paper if is a little bumpy and 
curling up. I glued a piece of mine to a manila tag and stuck it under 
a weighted book and it took care of the curling problem.

Tip: If you used slick paper scraps (magazine) in your design, you 
will need to coat your restructured paper with a coat of clear gesso 
if you will be doing any stamping on it. 

The tag I created with a section of my restructured paper. I layered 
a piece of white tissue paper onto my tag to soften and mute the colors 
with some gel medium. 


I applied some silver pigment ink around the edges and 
across the top to bring out some definition. 


Finished tag: 

A card using a section of the paper: 

I hope you will give this fun technique a try. I think you will 
really enjoy the process and be happy with your results.

Leave us a comment with a link if you'd like to share
your restructured paper adventures.

Cathy C.
Paper Traders

5 comments:

art by wendy said...

I love this! I have a HUGE bag of scraps I just couldn't throw away and now I know what I'm going to do with them!!!!! Thanks for the tutorial!!!

Jo Murray said...

Thanks Cathy....you have made a collage, not just restructured paper...I love it.

fairyrocks said...

This is great. Thank You for this.
The wheels are turning now.

Elizabeth Johnson said...

This is great! Thanks so much!!!
~Elizabeth

Chris Stern / CS Designs said...

Absolutely love this project, and can see so many hours of creative fun. Thanks so much for sharing this am definitely going to give it a try.
:) Chris / CS Designs