


 Before we start I must give credit for this technique to Diana Kovacs of Moon Rose Art Stamps from whom I learned it. I have a number of her stamps in the Diffusion line from Hampton Arts and use them a lot for this technique. I have had them for a while so am not sure all are still carried by Hampton Arts, but an internet search should help you find them. If not you can do this technique with any stamps, you just need some solid ones for the main images.
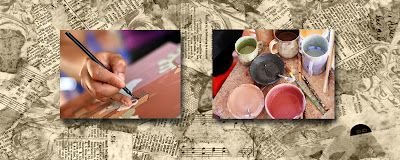
Here I have altered the technique a bit from Diana's in that I like to try dye inks and water for a different effect. Lately I have been playing with my palette and pear stamps, and waterbased ink. To try this you need a palette stamp - any shadow block stamp will do. On these ATCs I used a stamp that has a couple of vein lines in it so it looks kind of like marble when you stamp it plain.
Ink up the stamp with the lightest color at one corner and work diagonally across the stamp adding colors in order of intensity. I used three for the shading - all Ranger inks – tawny yellow, caramel, and wild plum. This isn't a very big stamp so three was enough.
After you have your colors on the stamp, take a dark color (I used espresso) and tap it along the edge of the rubber. Now you can go ahead and stamp it - or, if you want the watercolored look, spritz it with water using a mister, then stamp it. Either way, you will want to mist it after stamping and stamp it again. I usually get three stampings before I have to re-ink. The first will be intense, the next softer and the very last pastel. All are beautiful and give totally different looks.
You can now go ahead and stamp images over it if you want them to be kind of watery looking, or wait until your background is dry if you don't like that effect. Color in the images using watercolor markers. After the card is dry, go back and add more color to the images (#2 & #4). If your pear is a solid stamp (as in #5) color with watercolor markers right on the stamp using at least three colors.I colored the pear yellow then I added green along one side and wine along the other, shading it together as I went. Use all three colors on the leaves too. Add a little brown accent along the edges by just running the edge of the marker along the edge of the rubber. Then, breathe on it until it looks quite moist, and stamp. Add text and accents as desired.
Something else to try. On some of the ATCs (I made more, but only posted three.) I inked my pear and stamped right on the inked rubber before stamping it. Yo u don't want to mist if you do this as your image will wash out. For the second and third stampings just breathe on the stamp to re-moisten it before stamping again.
After stamping, if they don't look watery enough, stand back a little and mist above your paper so the mist just drifts down onto it. Then LEAVE IT ALONE until it dries. It is very tempting to try to help, because the paper will curl up and it will seem like it is going to all run together, but as it dries it gets pretty again. I did this on some of mine and it is what gives them that halo of color around the images. If it washes out your main image you can always go back with your markers and touch it up after it is totally dry. This is a good project to do right before going to bed or work so you can leave it be and check it much later.
Another dimension - when you have your palette covered with ink and before you stamp - or before you add your focal image, you can take a dry texture stamp and press it to the inked palette to remove some of the ink. This will give you reverse texture. (See #5 – the grid is quite visible, but if you look closely you will also see little spots in the yellow where I stamped another texture.)
I love using the Bamboo Pattern - Item: DF2202 - from Hampton Arts as well as a screen one I have from Hero Arts. Probably my favorites though are some I made from the non-slip rubber matting that is used under throw rugs or as shelf liner. It is inexpensive at places like Walmart (by the shelf paper or near the carpet tape) and every brand seems to have a different texture. You can use Aleene's tack-it-over-&-over glue to attach it to a block and you'll have a great texture stamp. If over time the rubber gets ratty you can replace it, but usually I love it even better ratty - More interesting textures!

The palette stamps give a totally different look if you use pigment inks. You can just keep building layers of images on the palette and then stamp it and add some text or accents. If using words you will want to add them after you stamp the palette or they will be reversed. (i.e., daVinci!) Do breathe on them and do some second and third stampings. You may like them better than the first. And, if they come out very faint, you can use them for great backgrounds and add images over them as in card #4 (which is actually a second stamping background).
Enjoy!