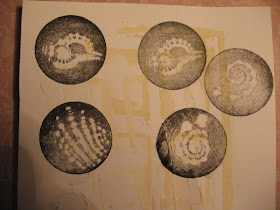
I made some foam stamps this weekend
from a technique I learned at my
Artful Gathering class under Jodi Ohl.
She actually used foam blocks about
the size and shape of kitchen sponges
but I couldn't find any here in town.
So I improvised and I think they turned out well.
I picked up this bag of foam blocks at Michael's,
But I have seen them plenty of places.
Target actually has some small bags of these in
their front area dollar bins.
But I have seen them plenty of places.
Target actually has some small bags of these in
their front area dollar bins.
Pick out object you want to create a stamp with.
This was the metal base from a ceiling hook for a plant.
Get your foam piece and your heat gun/source
Heat the top/end of your foam carefully.
Not too close or the foam will melt;
maybe about 2 inches away.
You may have to try this a few times to get the hang of it.
But, you really only need to hold it there less than 5 secs.
Now either quickly flip your foam piece on top of the object
and press down firmly for about 10 secs or
place the object on top of the foam and press down
with something hard, NOT YOUR HAND.
The foam is hot. I used a jar of Golden Medium.
This is a little tricky to keep steady.
I recommend the top way.
This is a little tricky to keep steady.
I recommend the top way.
Here is the result.
These are the stamps I made by using this technique and
pressing small shells into the foam pieces.
The detail actually surprised me.
The detail actually surprised me.
Love the look of these!
Have fun with this and be careful using your heat gun.
Cathy L Calamas - PT Mod
Cathy L Calamas - PT Mod


Nice tute, Cathy! xoxo
ReplyDeleteVery clever. Thanks for sharing:D
ReplyDeleteGreat tut and the detail is amazing. Thanks for reminding me of this, time to get the foam out again.
ReplyDeleteLesley :)
Thanks for sharing, what a great little tutorial!!!!
ReplyDeleteVery clever.
ReplyDelete