Thursday, September 22, 2011

Vintage Circus Mini Book Swap

Open to Paper Traders members only
(sample mini book by Lynda Roddy Ozzauto)
Vintage Circus Mini Book Swap
5 for 5 page swap
Skill Level: 2- Budding
Due: October 22, 2011 (postmarked)
Hosted by: Lynda Roddy-Ozzauto

Make 5 pages (decorated front and back). Backs can be decorative paper or more artwork - just finish the backs of the pages so they’ll look nice when the book is opened. Page size is 4” wide x 3” high and should be out of something sturdy so the books will stand up accordian style. Lynda will punch holes and tie the pages together with ribbon before she sends them back to you. Please keep thicker embellishments away from the edges to leave room for binding.

Think colors, clowns, animals and popcorn! It’s a day at the circus. Vintage Style. Use any medium you’d like - paint, collage, fabric, etc. Add embellishments - ribbons, beads, tickets, tokens, etc. There are plenty of vintage images available to use - for some inspiration check out these sites: Alpha Stamps, Deviant Scrap, Art Chix Studio, Scrapgraphics

POSTAGE: Please send $3 cash or ephemera to cover cost of postage and put pages in a plastic bag inside the mailing envelope.

Sunday, September 18, 2011

Halloween Flip Book Swap

Open to Paper Traders members only
(flip book sample by Connie Holso)
Halloween Flip Book
Skill Level: 2, 3
SIGN-UPS DEADLINE: September 18th (this is a firm sign up date)
POSTMARK DUE DATE: October 10th - so I can get them back to you by Halloween! International players, please mail as early as possible. Please include $2 for return postage. International players may include ephemera in lieu of postage.
Hosted by: Connie Holso

This will be a little book where each page is cut into three sections, one for the head, one for the middle and one for the legs. You can flip the pieces to put the different parts together. You will make your pages in three twinchie sections (2 inch squares for each section), so when they are put together the pages will be 2 by 6 inches. Top section will be a head (& maybe the shoulders) of a vintage person in a Halloween style. Middle will be a decorated section instead of a torso. Bottom will be the legs.

Please do not punch your pages - I will do this when I bind them. No thick embellishments to the left side of the pages as I need at least 3/4 inch to punch and bind. Decorate the backs of pages so they look nice. Sign one section of each page.

Connie Holso

Friday, September 16, 2011

Gallery: Bleach Stamped Background Papers

Amanda E 
Amanda E 
Beckie H 
Beckie H
Cathy C
Connie H 
Connie H 
Karen B 
Karen B 
Karen B 
Karen B 
Karen B 
Lorna S
Lorna S
Lorna S

Thursday, September 15, 2011

"Game Day" Challenge

This challenge is now closed.
Saturday College Football
Monday Night NFL
October's World Series
The Fall is filled with games, games, games.
Whether it be trivia night at your favorite spot,
family game night at home
or Bingo at church,
we want your game creations!


You don't have to be a member of Paper_Traders Yahoo Art group to participate
but if you would like to join us and be privy to even more great paper crafting swaps and
challenges plus better than ever artistic support, that would be super!
When the challenge closes, we will pick a winning piece that best showcases the theme
of the challenge and/or supply requirement.

 Challenge Rules
1. Make a paper craft, mixed media or digital piece of art ( any size). The theme is
  "Game Day" .
2. Post your art to your blog, Flickr, Picasa (online albums). Mention
   our name PaperTraders Art Blog with a link back to this post.
   You are more than welcome to grab our button and post it on
    your blog as well.
   The last day to post for this challenge is October 14th, 2011.
3. After posting your "Game Day" art on your site,
   come back to this post and  use the Simply-linked widgit below
   to leave us a link to your post/image.
   You must include a direct link to your image or post,
    not a general link to your album or blog.

  NOTE: after using the Simplylinked widgit, you will need to refresh the page for
   it to show your submission link.

   Or you may create a link within the comment box below:
   All you will need to do is copy and paste the url address of your post found
   at the top of your browser window.
4. The winner(s) will be awarded our "Trader Treasure" blog badge which
     they can choose to feature on their blog.
    Their art will also be posted on the PaperTraders Art Blog for 2 weeks.

Free images to get you started!


Isn't this the best pic of a sandlot team?


Member Inspiration Art


by  Cathy C.


by Amy W.

by Beckie H.

Have fun playing around with this theme.

Monday, September 12, 2011

Gallery: Autumn Banners

Amanda E

Barbara S

Beckie H

Connie H

Friday, September 9, 2011

Make your own foam stamp tutorial


I made some foam stamps this weekend
from a technique I learned at my
Artful Gathering class under Jodi Ohl.
She actually used foam blocks about
 the size and shape of kitchen sponges
 but I couldn't find any here in town.
So I improvised and I think they turned out well.

  I picked up this bag of foam blocks at Michael's,
But I have seen them plenty of places.
Target actually has some small bags of these in
their front area dollar bins.


 Pick out object you want to create a stamp with.
This was the metal base from a ceiling hook for a plant.
Get your foam piece and your heat gun/source

Heat the top/end of your foam carefully.
 Not too close or the foam will melt;
maybe about 2 inches away. 
You may have to try this a few times to get the hang of it.
 But, you really only need to hold it there less than 5 secs.

 Now either quickly flip your foam piece on top of the object
and press down firmly for about 10 secs or
 place the object on top of the foam and press down
with something hard, NOT YOUR HAND.
The foam is hot. I used a jar of Golden Medium.
This is a little tricky to keep steady.
I recommend the top way.

Here is the result. 

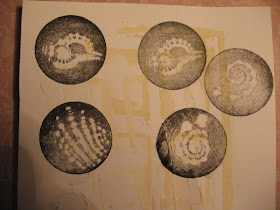
These are the stamps I made by using this technique and
pressing small shells into the foam pieces.
The detail actually surprised me.
Love the look of these!

Have fun with this and be careful using your heat gun.
Cathy L Calamas - PT Mod

Thursday, September 1, 2011

Carnivals and Fairs Blog Challenge

This Challenge is now closed.
September!
Carnival and Fair time in many of our areas.
Funnel cakes, cotton candy, fried candy bars (really?!)
Midway rides and prize stuffed animals
bigger than your kids!

As you can guess, our theme is Carnivals and Fairs for this challenge.

You don't have to be a member of Paper_Traders Yahoo Art group to participate
but if you would like to join us and be privy to even more great paper crafting swaps &
challenges plus better than ever artistic support, that would be super!
When the challenge closes, we will pick a winning piece that best showcases the theme
of the challenge and/or supply requirement.

 Challenge Rules
1. Make a paper craft, mixed media or digital piece of art ( any size). The theme is
  "Carnivals or Fairs" .
2. Post your art to your blog, Flickr, Picasa (online albums). Mention
   our name PaperTraders Art Blog with a link back to this post.
   You are more than welcome to grab our button and post it on
    your blog as well.
   The last day to post for this challenge is September 29th, 2011.
3. After posting your "Carnivals or Fairs" art on your site,
   come back to this post and  use the Simply-linked widgit below
   to leave us a link to your post/image.
   You must include a direct link to your image or post,
    not a general link to your album or blog.
  NOTE: after using the Simplylinked widgit, you will need to refresh the page for
   it to show your submission link.

   Or you may create a link within the comment box below:
   All you will need to do is copy and paste the url address of your post found
   at the top of your browser window.
4. The winner(s) will be awarded our "Trader Treasure" blog badge which
     they can choose to feature on their blog.
    Their art will also be posted on the PaperTraders Art Blog for 2 weeks.

Free images to get you started!


 credit


Member inspiration work


by Beckie H.


By Amy W.


by Heather R.


by Cathy C.